
OAuth2-based authentication on Istio-powered Kubernetes clusters
You have just installed your first Kubernetes cluster and installed Istio there to get the full advantage of Service Mesh. Thanks to really awesome quickstarts, the process was way simpler than you’d expect. Next, you installed the first service, either Nginx web server or some echo server. After setting up Istio’s Gateway and VirtualService, it’s suddenly available in your web browser. But, the browser warns you about unencrypted connections. A few searches in Google and you have cert-manager installed with Let’s Encrypt issuer set. Great success! Your webpage is available on https://myservice.example.com, the browser tells the connection is encrypted and you can’t stop smiling, looking at how the service mesh routes the requests after hitting F5 again and again.
Suddenly, you realize you didn’t enter any password when accessing the service. Wait, is it a public endpoint? You send the link to your friends, they all can access the url. Your private small service mesh is actually a public one, and the more endpoints you create, the more public it will be. You would be surprised, knowing how many services are there, on the Internet, protected by nothing else than a DNS entry that others do not know. Your service mesh deserves better than that!
Kowalski? Options!
There are several ways to provide authentication to your services on a public cluster, but only a few methods will use the native Istio and Envoy functionalities:
- WebAssembly Modules provide built-in filter implementing “Basic Auth”. If you provide username and password in the configuration, it will enforce using these when requesting the services installed on Istio. But, it makes your configuration un-versionable in git (you wouldn’t store passwords in the repo, would you?)
- OpenID Connect implementation like Dex (used by Kubeflow) will redirect unauthorized users to a nice login form with multiple login options: username+password, LDAP, OAuth2, and more. But, it lacks the “Remember me” checkbox, so it’s not very user friendly. Kubeflow uses additional authentication service just to provide sessions. But, two separate services just to enable authentication? Too much hassle.
- oauth2-proxy is a really good solution, especially with awesome quickstart by Luke Addison. Istio has a filter to delegate authentication-related subflow to the external service. In this case the service is oauth2-proxy that redirects unauthenticated clients to the OAuth2 upstream (like Google, Facebook or Github), you authenticate there (or not, if you did it before) and then the component exchanges code for your access token that not only proves you’re authenticated, but also provides some basic information, like name, email or photo url (Istio can pass these as headers to your service!). But, this method requires a separate component just to make one http call (for token). There must be an easier way!
- It is. Starting with Envoy 1.16.0 (Istio >= 1.8) there is a new filter called OAuth2. It does a token request (exactly how oauth2-proxy does), but makes it internally (directly from the Envoy component), so no additional tooling is needed. This feature is a pretty fresh one and there are not many tutorials on how to adopt it on the Istio cluster. So, let’s get down to business!
How does the OAuth2 Envoy Filter work?
When you access service with OAuth2 filter for the first time, it redirects you to authorization_endpoint - that is url of the external service, in case of Google it’s the modal that you have probably seen many times already:
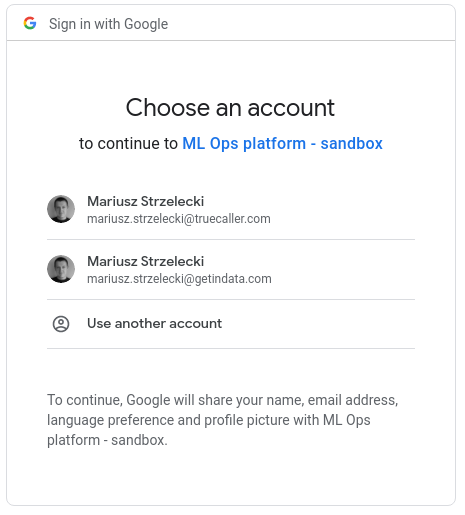
You can spot an application name (ML Ops platform sandbox in my case) and list of attributes that will be included in the token: name, email and profile picture. Then you select an account and google redirects you to the redirect_uri (configured in the filter specification), adding there a secret, temporary authorization code. This request is intercepted by the filter and it makes a request to token_endpoint, exchanging the code for a JWT token. Finally, filter sets 3 cookies:
- BearerToken - with a token value,
- OauthExpires - a timestamp indicating expiry of the token,
- OauthHMAC - a fingerprint of the above to avoid tampering with the cookies.
If everything succeeds, you’re redirected to the original url (the one you wanted to access before request was intercepted by a filter) and every consecutive request is just quickly validated (for the correctness of the cookies) and forwarded to the downstream service.
It is a good practice to install the filter on the very first layer for external connectivity to your mesh, that is Istio Ingressgateway. Sample setup looks like the following:
apiVersion: networking.istio.io/v1alpha3
kind: EnvoyFilter
metadata:
  name: oauth2-ingress
  namespace: istio-system
spec:
  workloadSelector:
    labels:
      istio: ingressgateway
  configPatches:
  - applyTo: CLUSTER
    match:
      cluster:
        service: oauth
    patch:
      operation: ADD
      value:
        name: oauth
        dns_lookup_family: V4_ONLY
        type: LOGICAL_DNS
        connect_timeout: 10s
        lb_policy: ROUND_ROBIN
        transport_socket:
          name: envoy.transport_sockets.tls
          typed_config:
            "@type": type.googleapis.com/envoy.extensions.transport_sockets.tls.v3.UpstreamTlsContext
            sni: oauth2.googleapis.com
        load_assignment:
          cluster_name: oauth
          endpoints:
          - lb_endpoints:
            - endpoint:
                address:
                  socket_address:
                    address: oauth2.googleapis.com
                    port_value: 443
  - applyTo: HTTP_FILTER
    match:
      context: GATEWAY
      listener:
        filterChain:
          filter:
            name: "envoy.http_connection_manager"
            subFilter:
              name: "envoy.filters.http.jwt_authn"
    patch:
      operation: INSERT_BEFORE
      value:
       name: envoy.filters.http.oauth2
       typed_config:
         "@type": type.googleapis.com/envoy.extensions.filters.http.oauth2.v3alpha.OAuth2
         config:
          token_endpoint:
            cluster: oauth
            uri: https://oauth2.googleapis.com/token
            timeout: 3s
          authorization_endpoint: https://accounts.google.com/o/oauth2/v2/auth
          redirect_uri: "https://%REQ(:authority)%/_oauth2_callback"
          redirect_path_matcher:
            path:
              exact: /_oauth2_callback
          signout_path:
            path:
              exact: /signout
          credentials:
            client_id: myclientid.apps.googleusercontent.com
            token_secret:
              name: token
              sds_config:
                path: "/etc/istio/config/token-secret.yaml"
            hmac_secret:
              name: hmac
              sds_config:
                path: "/etc/istio/config/hmac-secret.yaml"
The first part of the filter creates configuration of the oauth cluster, as the filter uses standard Envoy proxy functions to make HTTP requests. The second part adds a filter itself. You can notice a few configuration options mentioned above, plus 3 we didn’t describe yet:
- client_id - this is public ID of your OAuth2 provider, used for authorization endpoint redirection and token exchange
- token_secret - also known as “client_secret”, it’s a private part of OAuth2 setup that is required for token exchange. You shouldn’t store it in git, even the filter requires it to be available as a secure local file on istio ingressgateway pod
- hmac_secret - value used for fingerprinting the token, stored securely in the same method as token_secret.
The sample file with secrets can be injected into ingressgateway pod using configmap:
apiVersion: v1
kind: ConfigMap
metadata:
  name: istio-oauth2
  namespace: istio-system
data:
  token-secret.yaml: |-
    resources:
      - "@type": "type.googleapis.com/envoy.extensions.transport_sockets.tls.v3.Secret"
        name: token
        generic_secret:
          secret:
            inline_string: "..."
  hmac-secret.yaml: |-
    resources:
      - "@type": "type.googleapis.com/envoy.extensions.transport_sockets.tls.v3.Secret"
        name: hmac
        generic_secret:
          secret:
            # generated using `head -c 32 /dev/urandom | base64`
            inline_bytes: XYJ7ibKwXwmRrO/yL/37ZV+T3Q/WB+xfhmVlio+wmc0=
Google OAuth2 case
If you plan to use Google-based authentication, there are two additional things to consider.
First issue is that v1.17 of Envoy uses static “user” scope when doing redirection to authorization endpoint. It’s not a valid OAuth2 scope for google, so the redirect fails with an error message from Google. If you use Envoy v1.18, it can be overridden using auth_scopes parameter, but if you’re still on 1.17, you can inject small Lua script that would modify the parameter:
  - applyTo: HTTP_FILTER
    match:
      context: GATEWAY
      listener:
        filterChain:
          filter:
            name: "envoy.http_connection_manager"
            subFilter:
              name: "envoy.router"
    patch:
      operation: INSERT_BEFORE
      value:
       name: envoy.filters.http.lua
       typed_config:
         "@type": type.googleapis.com/envoy.extensions.filters.http.lua.v3.Lua
         inline_code: |
            function envoy_on_response(response_handle)
               if (response_handle:headers():get("location") ~= nil and response_handle:headers():get("location"):sub(1,44) == "https://accounts.google.com/o/oauth2/v2/auth") then
                location = response_handle:headers():get("location")
                location = location:gsub("scope=user", "scope=profile openid email")
                response_handle:headers():replace("location", location)
              end
            end
Secondly, Google token exchange endpoint returns two token:
id_token- JWT token containing all the requested attributes of the useraccess_token- starting withya29, allowing access to google services (but not providing any user details without extra call)
Envoy OAuth2 filter copies access_token, so it can be used for authentication only, not for authorization of the specific user.
What about CI/CD?
With the current setup we secured access to the services installed on Istio while they are accessed from the web browser. However, we still do not have a nice way to access the APIs in browserless mode, for example to call them using curl or from CI/CD processes.
Thankfully, Istio supports authentication (and authorization!) using decoded values from JWT tokens. The only requirement is to generate the token and pass it as a HTTP header with key Authorization and value Bearer: token. Request like this one should skip the OAuth2 filter we just configured, it’s supported by pass_through_matcher parameter:
pass_through_matcher:
- name: authorization
  prefix_match: Bearer
Now, we need to validate the token. First, we need to make sure it’s properly signed. We generate tokens using gcloud auth print-identity-token command (with service account key injected), and these are issued for specific audience. The following setup validates if JWT token was issued using this command:
apiVersion: security.istio.io/v1beta1
kind: RequestAuthentication
metadata:
  name: jwt-authentication
  namespace: istio-system
spec:
  selector:
    matchLabels:
      app: istio-ingressgateway
  jwtRules:
  - issuer: https://accounts.google.com
    jwksUri: https://www.googleapis.com/oauth2/v3/certs
    forwardOriginalToken: true
    audiences:
    - 32555940559.apps.googleusercontent.com # google token generator
Now, we need to create authorization policy to allow only tokens generated for given service account (or lack of this token):
apiVersion: security.istio.io/v1beta1
kind: AuthorizationPolicy
metadata:
  name: known-user
  namespace: istio-system
spec:
  selector:
    matchLabels:
      app: istio-ingressgateway
  rules:
  - when: # Lack of Authorization header will push user to oauth2 filter
    - key: request.headers[Authorization]
      notValues:
      - 'Bearer*'
  - when: # CI/CD
    - key: request.auth.audiences
      values: ['32555940559.apps.googleusercontent.com']
    - key: request.auth.presenter
      values:
      - ml-ops-ci@gid-ml-ops-sandbox.iam.gserviceaccount.com
With above setup we set explicitly that we allow 2 types of requests:
- the ones without Authorization header (that were already validated by OAuth2 filter)
- the ones with valid Authorization header, generated by gcloud command for given service account.
Summary
Starting with Envoy 1.17, authentication and authorization to Istio clusters doesn’t require setting up external services if you decide to use OAuth2. It’s a secure method, as you don’t have to store password hashes, maintain MFA and keep user data - you just need to trust your OAuth2 provider’s token that confirms the user was properly authenticated.
What is important to mention is that this method works on both public and private clusters - this method is often used to secure public clusters, but if you have internal Istio cluster you can authenticate users using already available identity providers like Active Directory (via ADFS) or LDAP (via Ory Hydra) without a need to look for specific Istio filters.
I must admit that the amount of YAMLs to put on the Kubernetes cluster is huge and the setup is very verbose - all the code listings in this blog post have over 150 lines of code! But once applied and tested, it doesn’t require any extra work while adding new services or endpoints, so you should never be worried again about authentication to your service mesh.